The Five Decisions After Contact
- Read its direction, height, speed, and landing point before moving.
- Move the controlled fielder toward the ball without unnecessary switching or diving.
- Get close enough for the automatic catch or pickup before committing to an ambitious throw.
- Take the safest useful out instead of automatically chasing the lead runner.
- Once the defense controls the ball, hold runners rather than creating another risk.
Know Which Fielder You Control
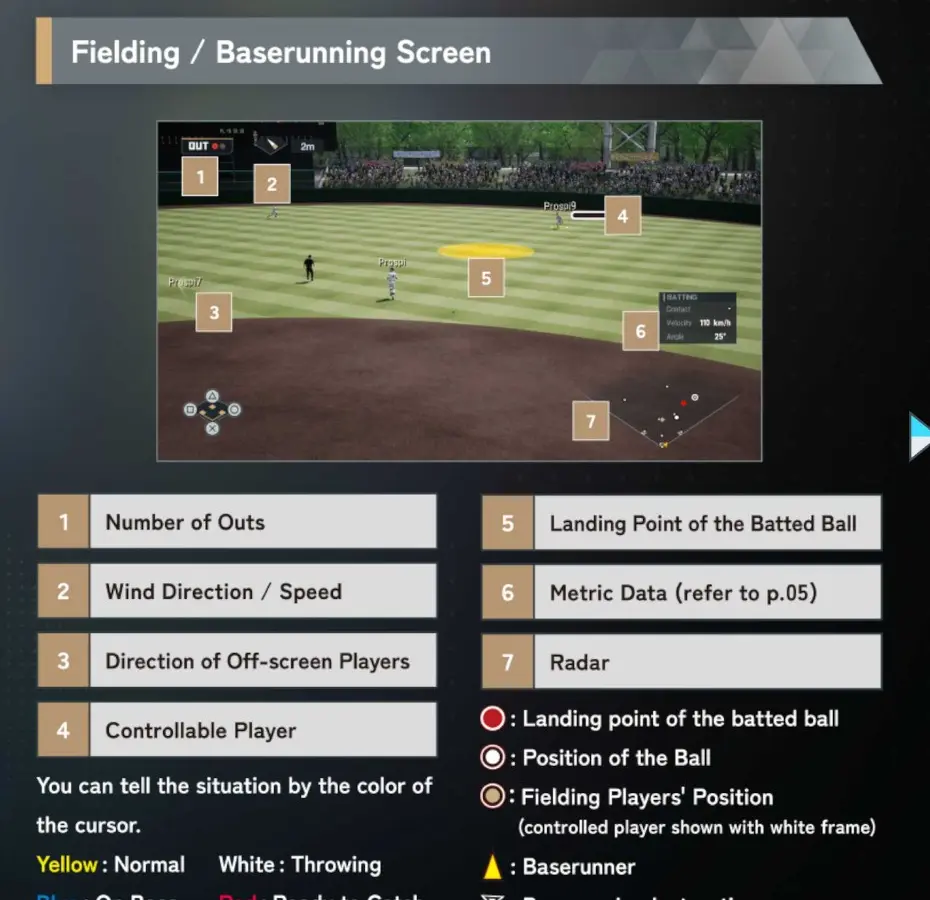
The controllable player is marked on the field, while the landing-point marker shows where a fly ball is expected to come down. The radar helps track the ball, fielders, and runners when they are outside the main camera view.
- Check the outs before deciding how aggressive the play must be.
- Use the landing marker to choose a route instead of chasing the ball’s current screen position.
- Use the radar to see runners advancing behind the play.
Routine Catches Are Automatic When You Reach the Ball
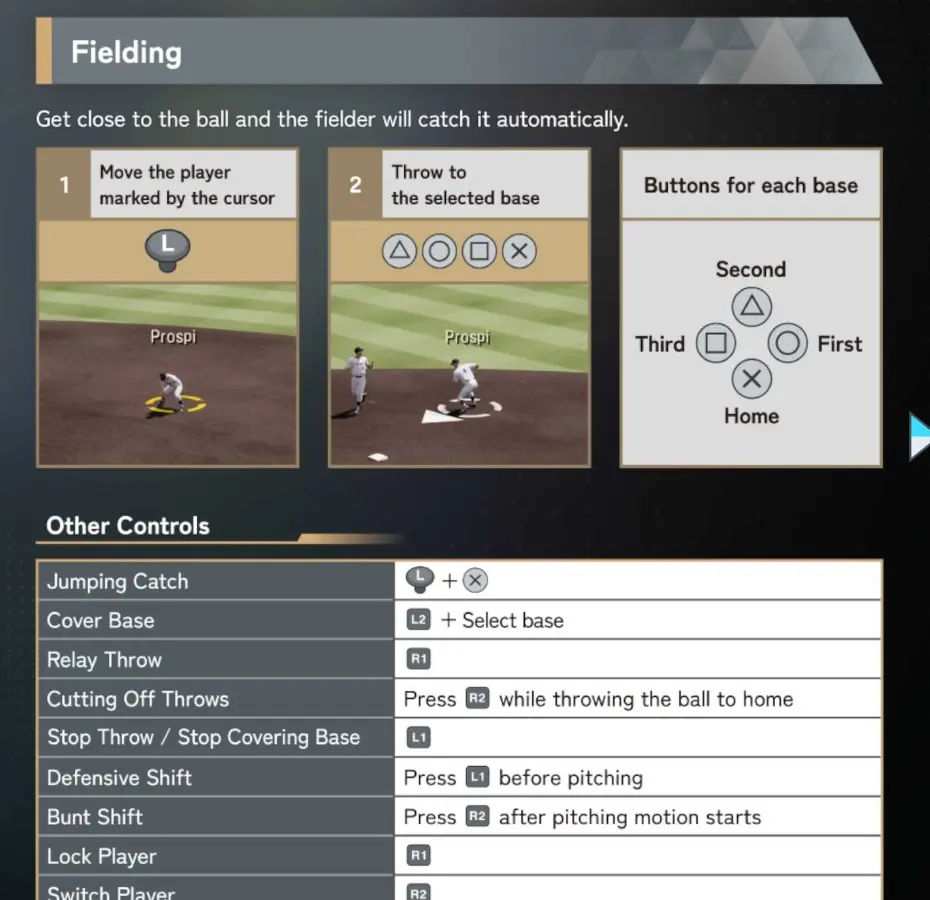
Move the marked fielder with the left stick. When the fielder gets close enough, a normal catch happens automatically. Your main job is therefore the route: arrive under the ball under control instead of turning every play into a jump or dive.
- Approach the landing point early and make small corrections near the end.
- Do not press a special-catch input for a ball the fielder can reach normally.
- Use left stick + × for a jumping catch only when the normal route will not reach the ball.
The Fastest Way to Turn One Mistake into Two
Thinking about the throw before the ball is secured often ruins the route or triggers the wrong action. Reach the ball first; select the throw once the play is under control.
Learn the Base-Button Map
| Button | Throw destination | Easy way to remember it |
|---|---|---|
| ○ | First base | Right side of the button diamond |
| △ | Second base | Top of the button diamond |
| □ | Third base | Left side of the button diamond |
| × | Home plate | Bottom of the button diamond |
The buttons mirror the bases on the field. Learn the shape once instead of memorizing four unrelated commands.
Direct Throw, Relay, or Cutoff?
| Choice | Input | Use it when… |
|---|---|---|
| Direct throw | Base face button | The target is close enough and a real out is available. |
| Relay throw | R1 | A direct outfield throw would be too long or slow. |
| Cut off a throw home | R2 while throwing home | The run is no longer preventable and another runner may advance behind it. |
Long throws become safer when the ball travels through a nearby defender. Match the command to the distance and danger of the play.
Choose the Throw from the Situation
- No realistic out: return the ball to the infield and stop every runner.
- Routine force play: take the sure out at the nearest valuable base.
- Possible double play: secure the first out before rushing the second throw.
- Long outfield play: use the relay instead of relying on one maximum-distance throw.
- Throw home is too late: cut it off if another runner can take an extra base.
Separate “All Runners” from “Selected Runner” Commands
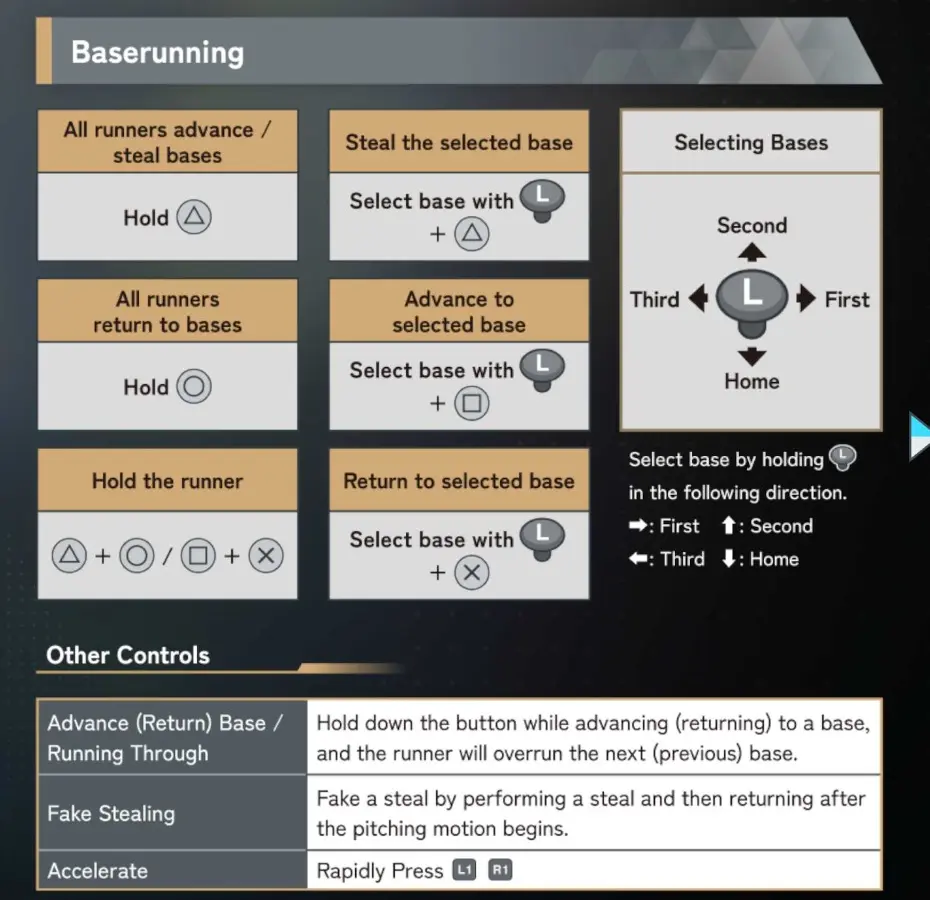
Baserunning becomes much easier once you decide whether the command should affect everyone or only one runner. Hold △ to advance or steal with all runners, and hold ○ to return all runners. For one runner, point the left stick toward a base, then choose the action.
- Left stick + △: steal the selected base.
- Left stick + □: advance to the selected base.
- Left stick + ×: return to the selected base.
Selecting a Base with the Left Stick
| Direction | Selected base | Common use |
|---|---|---|
| Right | First | Return a batter-runner or select a steal destination involving first |
| Up | Second | Advance or return a runner around second |
| Left | Third | Send or return a runner around third |
| Down | Home | Send the runner from third or choose home as the destination |
The stick direction selects the base on the field; the face button selects what the runner should do.
Read the Ball Before Sending the Runner
Do not decide on an extra base from runner speed alone. Watch how deep the ball travels, whether the fielder is moving toward or away from the next base, and how quickly the defense recovers it.
The Extra-Base Risk Check
| Question | Advance when… | Hold when… |
|---|---|---|
| Where is the ball? | It reaches the gap or carries deep | It stays shallow or is fielded cleanly |
| What is the fielder doing? | Recovering away from the target | Moving toward the target with the ball |
| Who is running? | A fast runner had an early start | A slow runner reacted late |
| How many outs? | The risk creates a needed scoring chance | The final out would erase the inning |
| What does the score require? | One extra base has major late-game value | An unnecessary out costs future chances |
Three Useful Runner Techniques
- Hold the runner: use △ + ○ or □ + × when runners should stay where they are.
- Run through a base: keep the relevant advance or return button held so the runner continues through the next or previous base.
- Accelerate: rapidly press L1 and R1 when an important play requires maximum effort.
Controls and Optional Reference
- How do I cover a base without chasing the ball?: Hold L2 and select the base. Use L1 to stop covering the base when the assignment changes.
- How do I fake a steal?: Begin the steal, then command the runner to return after the pitching motion starts. This is confirmed in the official 2026 manual.
- Are hook slides and special home-plate slides confirmed?: Older guides list directional slide inputs, but they are not part of this beginner method because the exact 2026 behavior still needs direct testing.
- Does holding a throw button make the throw stronger?: Older documentation and community testing conflict on this point. Treat throw strength as unresolved rather than building a defensive plan around tap-versus-hold timing.
- Can I redirect a throw after it starts?: Older releases allowed destination changes during the throwing motion. Because an early face-button input can also trigger a fielding action, this remains an advanced behavior to verify in 2026.
The Repeatable Ball-in-Play Routine
- Find the controlled fielder and take the clean route.
- Let automatic catching secure routine balls.
- Use the face-button diamond to choose the safest valuable base.
- Use relays and cutoffs to control long throws and trailing runners.
- Separate all-runner commands from selected-runner commands.
- Advance only when the ball, defense, runner, and game state support the risk.